Monday, June 27, 2011

Quin's Vinyl

When I am starting off on a new project or trying a new product, I LOVE to be able to research it as much as possible. My blog statistics say that the most googled and watched post that I have shared is for using Cricut Vinyl so I thought that I would share another project with you!

Quin chose this quote by C.S Lewis for her room!
This quote for Quin's room was done using the Hannah Montana Cricut Cartridge, along with the a swirl from the Home Accents Cricut Cartridge. Because I wanted such a large phrase, it meant that I would have to piece together each sentence after they were cut.

Using a 12 x 24" Cricut mat to cut out this larger quote really streamlined the process, as I didn't have to keep switching mats. I planned everything out on my Gypsy before I began cutting. :)

Follow some tips from my other Vinyl Post  to get started to create your design, and hopefully the additional guidelines below will ensure your success with a larger phrase!

1. Create your design. Using Cricut Gypsy or Cricut Design Studio will allow you to put it all together and visually love it before you cut it!

2. After cutting out your design and 'weeding' it (removing all the extra vinyl), trim each word and place Transfer tape over top of each word.

3. Position your phrase onto the wall and ensure that everything is straight and centered!

4. Remove the backing material from the phrase then burnish the vinyl onto the wall.


Are you looking for more Cricut Vinyl ideas and tips? Check out these other posts!

Cricut Vinyl
Just can't cut enough vinyl!

ps... doesn't vinyl have the oddest spelling ever??! lol

Happy Crafting!
Heather

Just can't cut enough vinyl!

My Step Daughter Danielle sparked my passion for vinyl phrases the other day when she showed me her beautiful book of Disney quotes from Hallmark. After taking my turn to browse through the entire book (it was very popular!) we decided that our dog Izzy had been ignored and needed 'her space' personalized with a nice vinyl phrase!

Izzy's space, minus her bowl.
Danielle, rightfully acknowledging that her space was equally important to Izzy's, also picked out a fabulous phrase and we both went to work picking our fonts and preparing the projects.

STEP ONE: For Izzy's space, I used the Hello Kitty font Cricut Cartridge (best friend) paired with the alphabet from the Cricut Classmate Learning Curve Cartridge. The paw prints came from the Cricut Lite Meow Cartidge ...let's tell Izzy it was the 'woof' cartridge instead!!


STEP ONE AGAIN: Danielle's project was a little more sophisticated that Izzy's. She picked this quote for her bedroom wall. I LOVE the crown and scroll details, they really complete the design! Danielle's project uses the Cricut Base Camp Cartridge  as well as Cricut Stone Script . The crown and scroll are both from the Cricut Solutions Home Accents Cartridge.

A couple of the cartridges that we used are now retired, but if there are SO MANY great fonts and images to choose from, that you won't be disappointed with the other options that you find.

I built my phrase on my Gypsy before cutting it out. This allowed me to really plan the project and see what the fonts and images would look like together. It also saved me piecing the phrase together once it was cut out.

Danielle used Cricut Design Studio for the same reasons. It was her first time using the program and as you can see from the results, she was very successful!

STEP TWO: Once you get your project designed, which really is what takes the longest, the next step is to cut it out on your Cricut. I used a blade depth of 3 and a medium pressure to accomplish a 'kiss cut'. A 'kiss cut' is when Cricut cuts through the top layer of the vinyl without cutting through the paper underneath. This makes it much easier to keep all of the letters in place and evenly spaced as you proceed.

STEP THREE: Once cut, the next step is to 'weed' your design. This is simply the process of removing the vinyl that you DON'T want. Use a pick tool of some sort or an exacto knife to pull it all away. Go slowly and be sure that you aren't pulling up part of your design!

STEP FOUR: Next, you'll need to lift your vinyl to place it onto the wall! You could, if necessary, pick each letter off of the backing paper and place them individually onto the wall. I did actually do this before I had Cricut Transfer Tape, but the transfer tape makes the task infinitely easier!

We cut a couple of sheets of vinyl to accommodate the larger sized lettering that Danielle chose. After everything was cut, we taped the words together to ensure that the spacing was correct for each line.


Danielle drew a light pencil line onto the wall to ensure that her quote was straight.
Once your design is weeded, simply peel the transfer tape off of it's backing and place it sticky side down onto your vinyl. Use the provided popsicle stick to stick the transfer tape onto the vinyl.

STEP FIVE: This is the best part!! Position your vinyl design onto the wall and burnish into place! If you do make a mistake on this step and find that a letter is out of sync with the rest of your design, you can gently lift it up and reposition it. Cricut brand vinyl is removable from most painted surfaces and I have successfully removed it months later with no paint lifting off along with it!


And that's it!! If you're looking for more vinyl decorating ideas, check out these bathroom ideas or the quote that I put up in my daughter's bedroom!

Izzy is currently on vacation in Saskatchewan with Alix, another of my daughter's, so I'll have to update you later with her reaction when she comes home to this fun surprise!

Sunday, June 26, 2011

Amazing Antique File Cabinet Find!

The enticing ebay picture that lured me in....

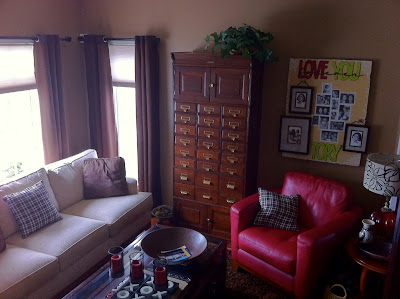
I am counting my lucky stars to have found this AMAZING file cabinet on ebay!! I have been admiring them for years and wondering how people can find them let alone afford them, and so when I saw this one reasonably priced on ebay, I crossed my fingers and inquired about shipping from the US to Canada...a couple of months later and whoohooo! It is here, home, with me, in my space, making me smile!!

The label reads 'Yawman and FRBE Rocheter, NY'
The cabinet has a total of seven stacking sections. There's even a lovely base and crown. The middle sections and drawers can be stacked in a multitude of fabulous ways! The store dated the cabinet from about 1895.


And... so then... now comes the hard part!! I said that when and if I ever got a cabinet, my plan was to essentially turn it into a giant scrapbook album. I am seeing little labels on each drawer designating different branches of our family tree. Each drawer could have all sorts of bits and pieces from and about the family branch that it represents! Wouldn't that be cool!? 

This is the cabinets new home in my front room! 
I guess I will have to set a weekly goal of even one 'bit' of something to go in there! 

Does anyone have any suggestions to make this easier? Any better ideas floating around out there that would be less work but equally fun and exciting??! 

And I guess I should also warn everyone... be careful what you wish for! I wished for one cabinet and once I found it another one also called out to me!lol I'll share pictures of it when it arrives!! 

Happy Crafting! 

Friday, June 24, 2011

Your Story Flip Books!

Do you remember creating cartoon flipbooks on the pages of your text books when you were young? It was SO MUCH fun!! I loved it and was reminded of the idea when Provo Craft had a Flip Book company attend a Gala Event last year. We all were allowed to make a custom flipbook that was ready in minutes! 

The flip book that I made at the event inspired our idea for these Birthday Party Invitations! 


And so, earlier this month, we got busy at my house using Your Story to  make our own custom 'flip book' Birthday Party invitations!!

Our finished flipbook covers.


If you've never used Your Story before, it is super easy! The system comes with book covers which are pre-made OR you can purchase glue strips that can be added to any home made book to create your own adhesive spine. It only takes a couple of minutes to heat up the machine, and then you tuck the book with pages into the machine and let the pages 'bond' into the glue. Once your book cools down you are done! 

 Super easy yes?! You end up with a really impressive hard or soft cover book at a fraction of the cost of ordering one online. Pre-made covers come in an assortment of sizes and you can bind scrapbook pages, photos, transparencies... all kinds of fun stuff. Maybe some of that end of the year school artwork that is coming home??!!

These are the 4"x6" covers that we used...


To make flipbook invitations, these are the steps to follow:

1. Create a file in Photoshop with a consistently sized window. Number each window, and drop in a series of photos that outlines the details of your event. You can create this file in layers, as you will need approximately 23 pages/pictures. Be sure to save each page as you finish so that if you are printing out multiples, you don't have to do any extra work!! Also be sure to number each page as it can be really confusing to assemble 10 books while trying to figure out the correct order that the pictures go in :)

2. Trim each picture and create the visual journey. You can stack the pics front to back or back to front. Play with it a bit to decide what your flipbook style is! 

3. Take a 4x6" Your Story soft book cover and cut it in half. I used my heavy duty paper trimmer and it worked like a charm! 

4. Insert your pages and follow the Your Story instructions to heat and bind your books. 

5. Decorate the front and back covers! We added additional details and information in an easier to read format on the back of the book. :)


I think that's it and I'd love to hear if you give this a try! It would be really fun to try to do up a Grandparent's brag book with sequenced photos and keep it in the 4"x6" size! 

Happy Crafting!
Heather

Monday, June 6, 2011

More Cake Please!!

It's THAT time of year again at my house!! Birthday's and Cake and Summer, hooray!! We always celebrate my daughter's birthday in early June with a bbq and crazy busy birthday party. 


This year's theme (if we have to say we had one) was a night at the movies. All of our party guests stayed up late watching a movie outside and we served popcorn! That's a theme right?!lol 


Any which way that you look at it, we all had fun! The cake was, of course, made using Cricut Cake, fondant, and gumpaste. The Street Sign Cricut Cartridge was PERFECT for the writing on our 'directors board' and I am happy to report that including rolling out the fondant, cutting out the letters AND putting it all together, this cake only took about one hour! I rolled out two full sheets of gumpaste for cutting out my letters, but I only used one :)

To make the black portion of the directors board, I rolled out black gumpaste onto my Cricut Cake Mat and then used the marked measurements on the mat to cut the pieces. The bottom is one solid piece of black, then the top 'clapper' is a second strip of gumpaste and finally in the top left there is a bracket that I cut freehand.

Quin was very very happy to have her cake and eat it too! She was so happy, that she was also very compliant this year when it came time to wear the Birthday Crown!

I found this crown in Las Vegas years ago and ever since it came home, it has been our family tradition that you don't get to open your birthday presents unless the crown is on your head! My older kids are adamant to boycott this tradition! For me personally, I am happy to wear the crown if I have a present on my lap! It's the least I can do! :)


My tips for making your own director's cake:
     1. You MUST have Cricut Cake!! The writing is what this cake is all about and you would be crazy to attempt this any other way!
     2. As always, roll your gumpaste out VERY thin to get a good cut on Cricut! Also be sure to freeze your gumpaste before cutting. 
     3. I added water to a small amount of gumpaste and then heated it in the microwave to make a consistency of bright white icing that I could use in an icing bag. I then free-handed the 'written' words on the director's board. I picked 'Roll 6' because Quin is our 6th child!! 
     4. The rolled fondant and gumpaste taste like a sugar candy, but they aren't as decadent or flavorful as a traditional cake frosting. I smothered the cake in a nice layer of our favorite buttercream before I put the fondant on top. 


Happy Birthday's AND Crafting!!

Heather


Cricut Cake - 50th Anniversary!

I am very proud to announce that I really do Practice what I Preach!! I am loving my family of Cricut machines these past few weeks as I helped my Mother and Father in Law to organize their 50th Wedding Anniversary!


At the top of our list was creating a masterpiece cake that would serve as the focal point at the reception. We put together a three tiered cake as well as 150 petit fours! 

The beauty of the cake was truly in it's simple look, however I would like to point out that it wasn't simple at all! Thank goodness I HAD Cricut Cake or we would never have had the same results. We decorated the entire cake by repeating a beautiful floral pattern from the Elegant Cakes Cricut Cartridge. The white gumpaste was a time saver as well as an elegant touch. To finish each tier we tied a length of gold ribbon along the bottom edge and that was it! 

Our bottom cake layer is an amazing Pound Cake recipe that I found online and the top two layers are styrofoam. Dorothy (MIL) re-vamped her 25th anniversary cake topper to create a new 50th cake centerpiece. 

For the petit fours, we used the same Elegant Cakes Cricut Cartridge to cut out monograms. We did G's, D's (Gary & Dorothy) and 50's to mark the occasion. This time I cut everything out of gum paste after kneading in a light golden color. A little bit of edible golden luster dust gave them just enough bling to make them perfect!

The petit fours were made from the same  Pound Cake recipe and we froze everything for a couple of weeks before the event so that we could manage our time and baking efforts a little bit easier. 
My tips and tricks to make this project easier??
     1. Ensure your Mother In Law has talent, patience and humor!
     2. Roll your gumpaste super thin to get a great cut.
     3. Freeze your gumpaste before cutting it. I rolled out a dozen sheets of gumpaste, put them all in the freezer and then went on a cutting rampage!
     4. When cutting such an intricate design, it is wise to pick all of the little 'bits' out of each design as you go. I rolled just enough gumpaste on each mat to cut ONE design out at a time. 
     5. To get nice 'soft' but 'square' corners on your petit fours, cut away the outer edges and the top of your cake. The fondant will drape evenly over all of the corners and edges without it poking through a sharp corner!
     6. If you plan to freeze your creations, ensure that they are completely frozen BEFORE you wrap them in plastic wrap or seal them in a container. This keeps any condensation from falling on your fondant/gumpaste and making it soft. Likewise, as soon as you pull everything out of the freezer, remove all coverings so that the fondant/gumpaste can breathe and adjust to it's new temperature without 'sweating'.

Happy Crafting!
Heather